The principle of optical triangulation measurements can be translated into two or three dimensions. The sensor can measure the distance to a single point on a surface while simultaneously measuring the distances to all surface points across the measuring field.
Rather than simply projecting a single point, various fringe patterns are projected onto the surface. Cameras then record the pattern, and using the data, calculate a 3D point cloud.
The 3D sensor surfaceCONTROL 3500 works in line with this principle. A matrix projector projects the sequence of various fringe patterns onto the surface of the measuring object. Two cameras are then used to record the diffusely reflected light of the patterns.
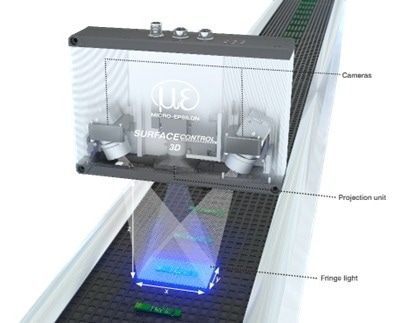
Image Credit: Micro-Epsilon
With the arrangement of the two cameras and the projector, the sensor’s computer calculates the three-dimensional surface of the test object using the recorded image sequences.
The surfaceCONTROL 3D 3500 sensor has been developed for the high-precision inspection of various surfaces, including metal, plastic, and ceramics. In just 0.3 seconds, full-area measurements are accomplished via a single snapshot to evaluate geometry, shape, and surface. While traditional systems can support 2.5D, the Valid3D technology allows for a complete 3D evaluation.
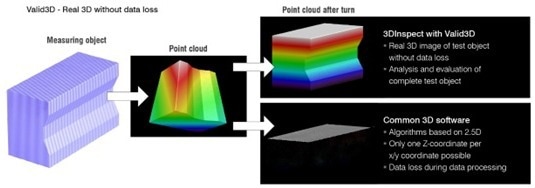
Image Credit: Micro-Epsilon
New reliability standards in 3D measurement technology are set with z-axis repeatability of up to 0.4 µm, meaning the slightest flatness deviations or height differences are easily detected.
This groundbreaking 3D sensor can be utilized for automated 3D measurement of hole spacing, flatness, and coplanarity of precision mechanical parts and electronic components.
Outstanding Precision
There are two readily available versions of surfaceCONTROL 3D 3500, which can measure an area of either 50 mm x 80 mm or 120 mm x 75 mm, respectively. Measurement precision is exceptional because repeatability of the height measurement in the z-axis can be achieved at around 0.4 µm.
As well as extremely high precision, Micro-Epsilon focused on two other key properties throughout the development process. One is speed, as the sensor is principally used for inline quality control, therefore, the measurement must be extremely fast.
Compatibility with industrial-grade equipment is also crucial, including easy integration into the application and other interfaces: Gigabit Ethernet (GigE Vision/GenICam), PROFINET, EtherCAT and Ethernet/IP are available. Four parameterizable digital I/Os can be utilized, for instance, as triggers or for the output of sensor states.
Housed in an industry-optimized enclosure, the compact, fully integrated sensor utilizes passive cooling to achieve the high IP67 protection class. Three mounting holes and the corresponding centering sleeves facilitate reproducible mounting.
Generally, applications in manufacturing are performed at approximately one-second intervals. Therefore, the measurement of the component must be conducted in one clean and fast attempt. During this short window, the measuring object cannot move.
Depending on the measurement task, the surfaceCONTROL 3D 3500 allows for the projection of up to 20 different fringe patterns, with the two cameras completing image acquisition in about 0.3 seconds.
The computer then calculates the 3D point cloud while the measuring object can be transferred to allow space for the next workpiece. The sensor can achieve up to 2.2 million 3D points per second.
Optimized for High-Precision 3D Snapshots
The processing time for a 3D point cloud depends on the measurement parameters and the complexity of the measuring object’s geometry.
With an optimized algorithm for processing, the point cloud calculation for the surfaceCONTROL 3D 3500 can be completed in less than one second, making the sensor perfect for quality assurance applications in manufacturing processes where production occurs at relative cycle rates.
An example of where automated inline geometry, shape, and surface measurements are necessary includes PCB manufacturing, where flatness is inspected.
The surfaceCONTROL 3D 3500 ensures the appropriate measurement precision of 2 or 3 µm. Even with highly populated PCBs, such faulty assemblies can be detected rapidly with excellent reliability.
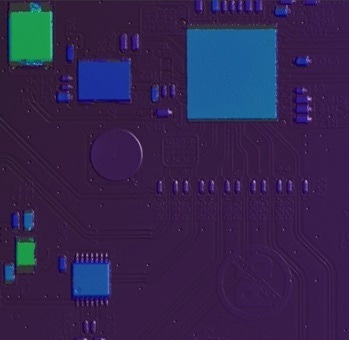
Image Credit: Micro-Epsilon
Powerful Software Tools
The user has numerous options to incorporate the 3D sensor, including the 3D-View software, which offers an easy-to-use user interface with which the surfaceCONTROL sensors can be addressed.
The software enables rapid sensor commissioning and evaluation. It sets and optimizes parameters and ensures that the measuring object and sensor are positioned appropriately.
The software can also be used to initiate data acquisition. Micro-Epsilon also offers 3DInspect software with the sensor, which is used for sensor parameter assembly and industrial measurement tasks.
This software interprets the data in three-dimensional form by broadcasting the measurement data from the sensor via Ethernet. Predefined measurement programs streamline the analysis of the measurement data. This makes the software both intuitive and extremely powerful.
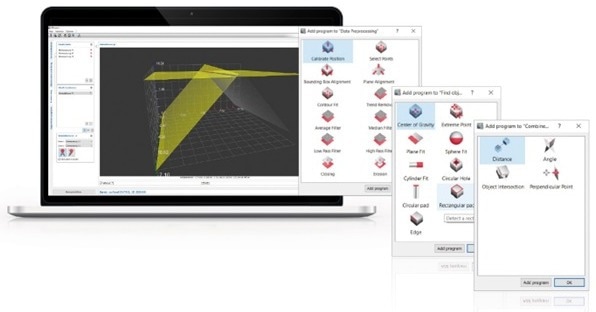
The 3DInspect software is intuitive to use and still offers a wide range of functions. Image Credit: Micro-Epsilon
Connection via SDK
If the user wishes to use or develop an alternative image processing solution, an all-inclusive SDK is available. This is in accordance with the industry standards GigE Vision and GenICam and offers several different function blocks.
A C/ C++/ C# library with several sample programs and documentation facilitates software development. Granting access to the sensor via GigE Vision is another possibility in lieu of SDK if you have third-party GenICam-compliant software.
Versatile Applications
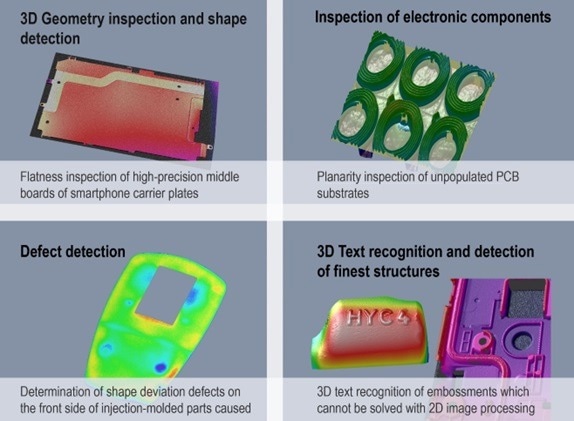
Image Credit: Micro-Epsilon
Its high precision and rapid speeds can distinguish the 3D snapshot sensor. The compact design means it is appropriate for applications in inline quality control. Including, for instance, the 3D measurement of mounting surfaces on components with complex geometries where the spacing of the holes and the coplanarity are crucial.
With injection-molded parts, variations in the shape of the surface can be easily detected at the points where fastening ridges are molded onto the back. Another common application is the evaluation of PCBs in electronics manufacturing; both before and after assembly.

This information has been sourced, reviewed and adapted from materials provided by Micro-Epsilon.
For more information on this source, please visit Micro-Epsilon.