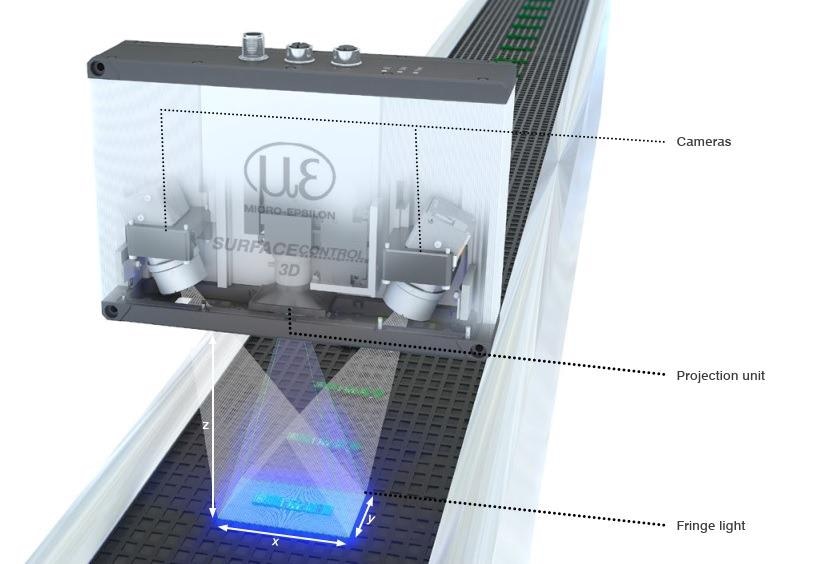
Precision sensor manufacturer Micro-Epsilon has introduced a new range of high precision 3D snapshot measurement sensors that are suitable for automated, inline measurement of geometry, shape and surface quality of objects. The sensors stand out due to their extremely high resolution and repeatability, as well as their large measuring area.

Image Credit: Micro-Epsilon
The new surfaceCONTROL 3D 3500 is a 3D snapshot sensor with a compact design and extremely high resolution in the Z-axis (from 1.0 µm). With a repeatability up to 0.4µm, the sensor sets a new benchmark in high precision 3D measurement technology. Due to its high performance, the sensor is able to reliably detect even the slightest of deviations in planarity, for example, or height differences of very small components (e.g. IC pins) on printed circuit boards. A high data processing speed of up to 2.2 million 3D points per second enables the sensor to increase productivity in the respective application.
Fringe projection
The surfaceCONTROL 3D 3500 sensor operates on the principle of optical triangulation based on fringe projection, which allows direct 3D measurement of components. Using a matrix projector, a sequence of patterns is projected onto the surface of the target object. The light from the patterns is viewed and recorded by two cameras either side of the projector. The three-dimensional surface of the target object is then generated from the recorded image sequence.
The surfaceCONTROL 3D 3500 is available in two models, each offering a different measuring area and depth of field. Both models are fully integrated industrial sensors that are protected to IP67 with passive cooling (active cooling is available for higher operating temperatures).
Numerous applications
The sensor is suitable for a wide range of applications, including: 3D measurement of high precision mechanical parts; width, tilt angle and position measurement of rivets; surface defect detection; flatness inspection of circuit boards; planarity inspection of unpopulated PCB substrates; detection and evaluation of breaks on clutch discs; completeness check of electronic components on fitted PCBs; 3D text recognition of embossments that cannot be solved using 2D image processing due to lack of contrast; inspection of height and thickness of adhesive beading on smartphone shells; and determination of shape deviation defects on injection moulded parts.
Software integration made easy
The surfaceCONTROL 3D supports the very latest GigE Vision and GenICam standards for easy integration into third-party image processing software. A comprehensive software development kit (SDK) is also provided that allows customers to develop their own analysis software.
Also included in the scope of supply is Micro-Epsilon’s 3D View software, which offers a convenient user interface for surfaceCONTROL sensors. The software allows fast commissioning, evaluation of the sensor, set up and optimisation of parameters, and ensures the correct positioning of the measuring object and sensor. The software can also be used to start data acquisition. It enables 3D data to be visualised and exports this in different file formats (ASCII, CSV, STL, PLY) for further processing. The software is particularly helpful to systems integrators as it allows them to access all GenICam parameters and simplifies software integration. For inline applications, display of the measurement duration allows conclusions to be drawn about the process cycle time.
Real 3D data without data loss
The 3DInspect software from Micro-Epsilon is a powerful tool for sensor parameter set up and industrial measurement tasks with the SC3510 sensor models. The software, which is included in the scope of supply, transmits the measurement data from the sensor via Ethernet, providing this data in three-dimensional form. This 3D data is further processed, evaluated and assessed using 3DInspect measuring programs on a PC and, if necessary, logged and transmitted via Ethernet to a control unit. In addition to the fast data output via Gigabit Ethernet, the sensor offers an additional digital I/O interface. The 2D/3D gateway module (optional) offers EtherNet/IP, PROFINET and EtherCAT connections for measurement value transfer.
DefMap3D for individual surface analysis
surfaceCONTROL DefMap3D is a comprehensive software solution (not included in the standard scope of supply) for the detection and analysis of surface defects. It includes all components and processes required for set up, configuration and evaluation of inspection tasks. A wide range of features are included, from analysis of individual parts, measurement of small batches, as well as robot-supported inspection of several measuring fields. Sensor control, calculation of 3D point cloud and defect detection can be automated using macro commands.
As part of the surface analysis, the software provides several methods of detecting and objectively evaluating shape errors within the surface data. The targeted use of different filter types can reduce the effects of surface structures (e.g. graining). A report containing the inspection results is generated. The software is available in different versions whose scope of performance is oriented towards different measurement tasks (e.g. digital shape, digital stone, digital light tunnel).
Glenn Wedgbrow, Business Development Manager at Micro-Epsilon comments: “Previously, the way to capture a 3D image was to build up a series of 2D profiles, which meant having to wait for the individual profiles to be captured before processing and building the 3D point cloud. The surfaceCONTROL 3D sensors capture all that information in one go, resulting in much faster acquisition and processing times. The surfaceCONTROL 3D 3500 sensors will find applications in almost every industrial sector, from automotive production to electronics and machine building. In automated “stop-and-go” production lines, the surfaceCONTROL 3D 3500 sensor will outperform any other 3D measurement sensor currently available on the market, particularly in terms of its Z-axis resolution, repeatability, large measuring area and its comprehensive software development and integration tools.”
Source:
https://www.micro-epsilon.co.uk/