Oct 31 2014
Fraunhofer scientists have developed a high-resolution magnetic line camera to measure magnetic fields in real time. Field lines in magnetic systems such as generators or motors, which are invisible to the human eye, can be made visible using this camera. It is especially suitable for industrial applications, for example in quality assurance during the manufacture of magnets.
A prototype will be on display for the first time at electronica 2014 in Munich from November 11-14 (Hall A4 / Booth 113).
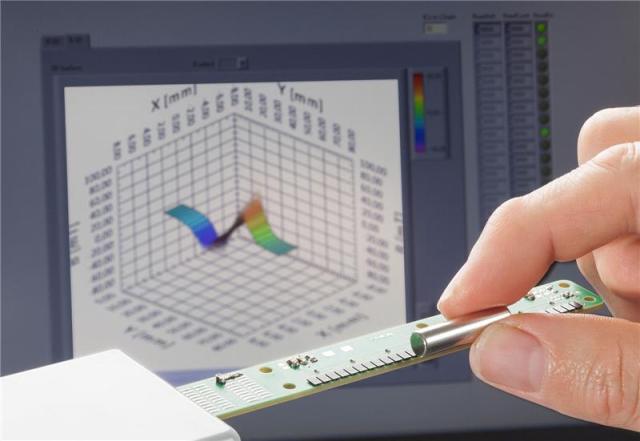
 The line camera visualizes magnetic field values in real time. © Max Etzold
We encounter magnetic field sensors everywhere today – but few of us know it. These sensors make sure washing machines run concentrically, that headlights automatically adjust to the correct angle if a car is heavily loaded, or that we are warned if a seatbelt is not fastened right. If a mechanical movement is transformed into a rotation, the magnetic sensor detects this and passes the information to systems downstream – to the headlight sensors, for instance.
It is therefore important that magnets operate reliably. Quality assurance during fabrication has been expensive and time-consuming until now. Researchers at the Fraunhofer Institute for Integrated Circuits IIS in Erlangen, Germany, have developed a line camera that can measure magnetic fields in real time and thus quickly detect defective magnets. It has become possible for the first time to integrate this kind of magnetic testing into industrial processes. The magnets are simply tested on the conveyor belt.
1000 images per second
“Imagine the device not as a camera, but more as a flat plate with a row of magnetic field sensors,” explains Project Manager Klaus-Dieter Taschka from IIS. The heart of the device is a 3D Hall-effect sensor named HallinOne® invented at his Institute: “It enables a sensor chip to detect in all three axes any magnetic field present. These kinds of sensors can solve a range of measurement problems, such as rotation angle sensors, separation and positional sensors, and rpm sensors for instance.”
Using the magnetic line camera, it is possible to measure the strength and direction of the magnetic field at 32 positions spaced 2.5 mm apart. The field lines thus become visible along the line over a distance of eight centimeters and can be monitored and recorded. The actual 3D sensor measures no more than 0.1 x 0.1 mm2 in size. This permits point measurements and thus very high measurement accuracy.
The measuring procedure itself takes place in just a millisecond, so the camera provides 1000 images per second. This speed allows the magnetic camera to be built into production facilities and test magnets on a running conveyor belt. The real-time aspect is also important, as the shape of the magnet as well as the magnetisation direction influences the measurement values and must be taken into account during calibration of the system. At the conclusion of the measurement process, the system assigns the various magnetic shapes to the measurement results and calculates in the error tolerances. For simple applications, the camera can be connected through a USB interface to a PC.
The next step is already planned: Fraunhofer scientists are currently working on a two-dimensional camera that can take magnetic color pictures of a 40 x 40 mm2 surface – and at a speed of over 100 images per second.